Dear All,

Procedure:-

Your final baked cake will look something like this :)


Hope you all enjoyed the tutorial and do let me know if you have any other requests for tutorial and I will try post the same.
Love,


Today I am going share a tutorial with you for baking an eggless black forest cake with step by step instructions. Hope this is helpful to all who are scared of baking cakes and will find courage and encouragement from this post to bake one successfully! I bakes this cake for my dad's 60th birthday for which we gave him a surprise birthday party :) The cake came out beautiful and was loved by everyone! It was moist and delicious!
I have just adapted the recipe which I used here in my earlier Eggless Chocolate Cake.
Now lets get started with the procedure without any further delays!
Ingredients For Cake:-
225 gms all purpose flour ie maida
1/2 cup unsalted butter ie 110 gms
4 tbsp of cocoa powder
1 tsp baking powder
1 tsp baking soda
1 tin sweetened condensed milk ie 400 gms
2 tsp of vanilla essence or seeds from 1 vanilla bean scrapped
200 ml coke or pepsi
Ingredients For Icing:-
1 cup heavy whipping cream
1 cup or more chocolate curls or shavings
1/2 cup cherries, remove the seeds and slice it in half
For sugar syrup - Mix 4 to 5 tbsp of sugar in half cup of water.
Procedure:-
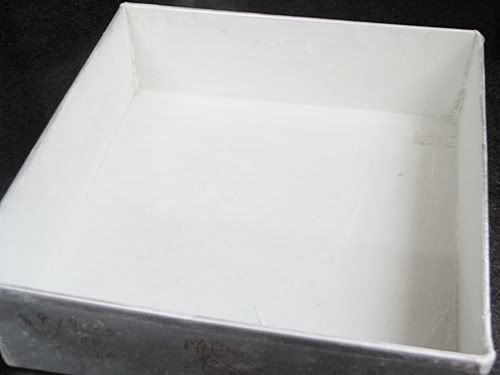
- Grease and flour a 9 inch square baking pan, preheat the oven at 190 degrees C.

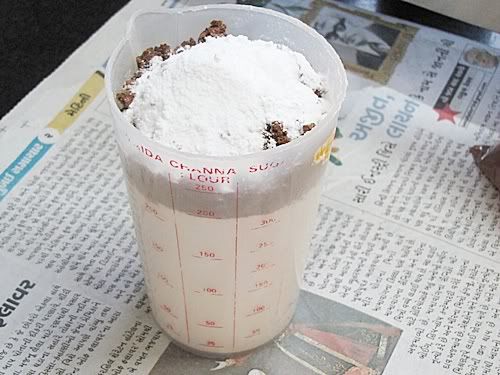
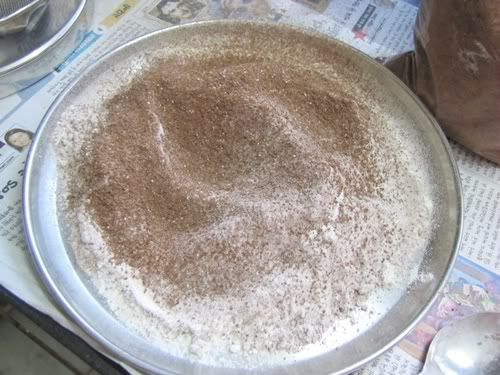
- Measure all the dry ingredients ie flour, baking powder, baking soda and cocoa powder.

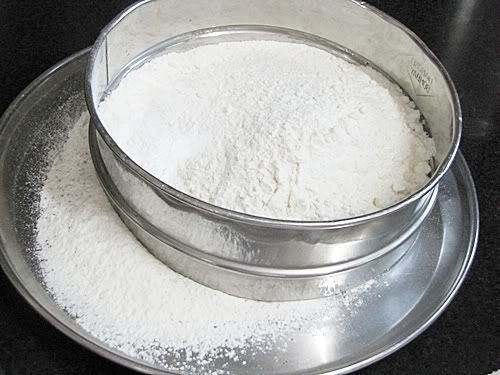
- Sieve the dry ingredients.


- Melt the butter in microwave and cool it completely.

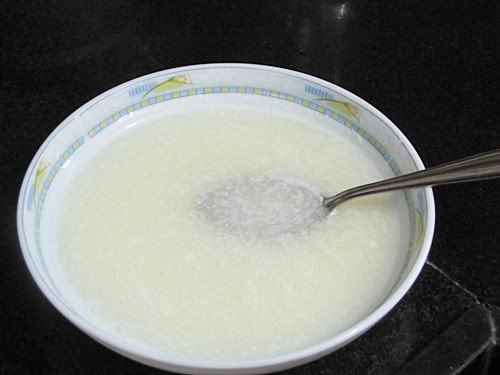
- Beat together condensed milk and butter until its light and cream.

- Add in your vanilla essence or scrapped vanilla beans which I have used.

- Beat it together until its well mixed.

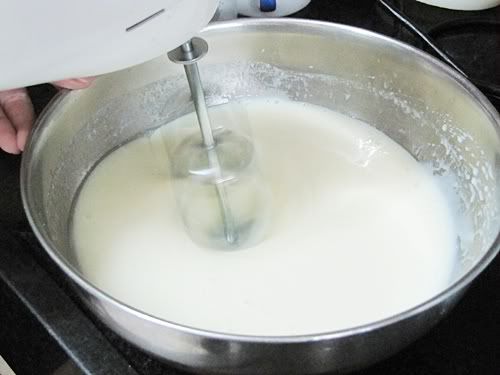
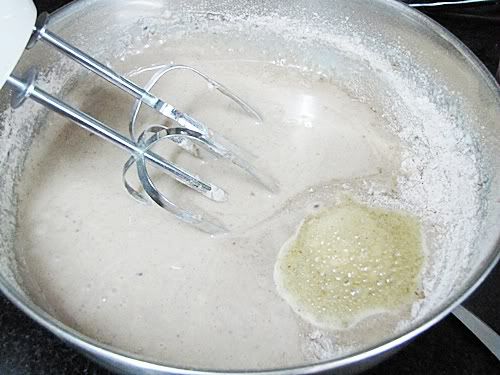
- Now start adding the dry ingredients along with little coke at a time and beat slowly, follow this until all the dry ingredients is well blended and you get a uniform batter.

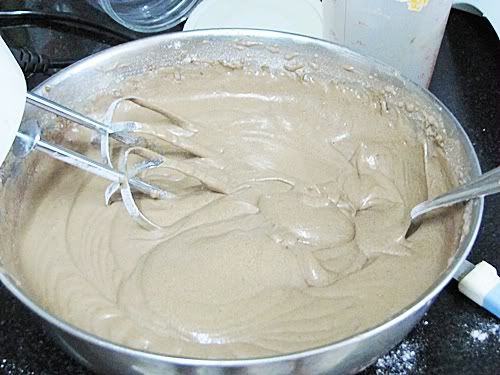
- This is how your final batter will look like.

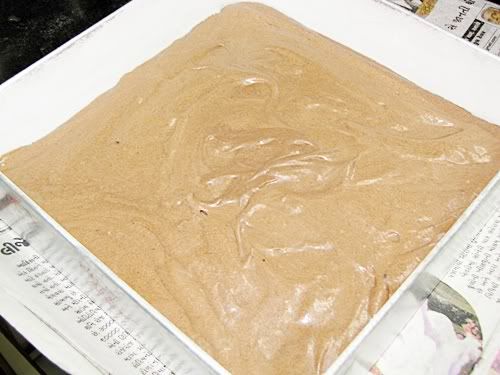
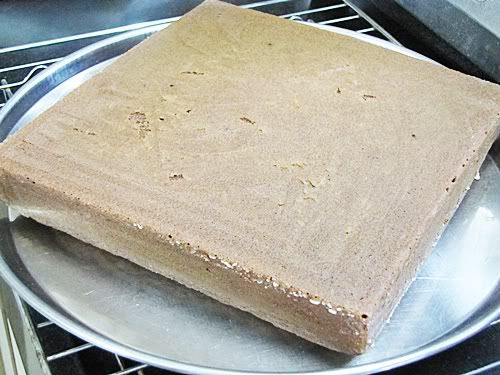
- Pour the batter in the prepared baking tin and bake for 35 to 40 mins until a tooth pick inserted comes out clean.

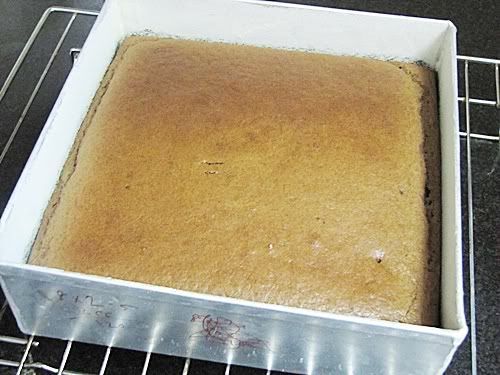
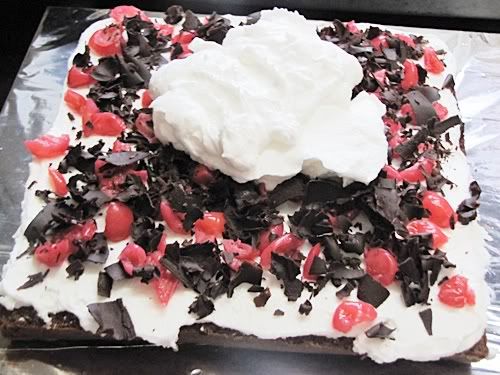
Your final baked cake will look something like this :)

- Once its baked..remove from oven and cool it completely before inverting.

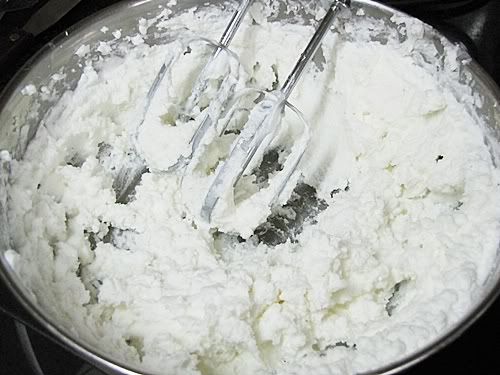
- Now lets prepare the icing for the cake, take 1 cup of heavy whipping cream and beat it on high for 8 to 10 mins until its stiff enough and hold its shape. To make sure if the cream is ready it should give peaks.

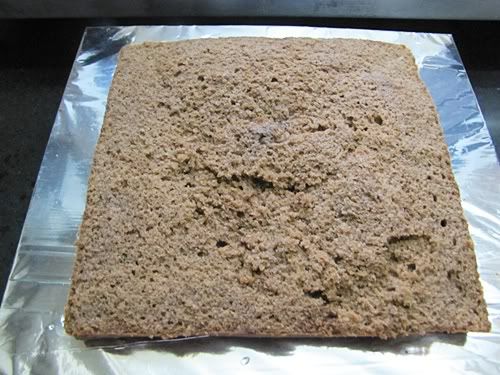
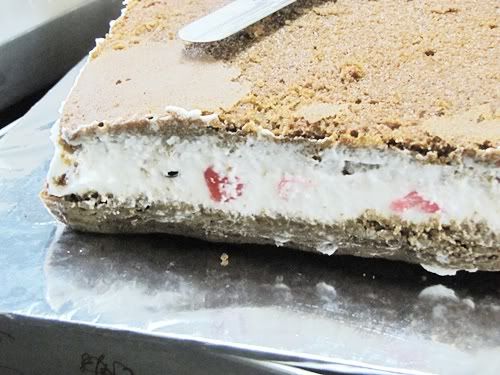
- Cut the cake from middle and divide into two and moisturize it using the sugar syrup we made earlier.This will help to keep the sponge moist and soft.

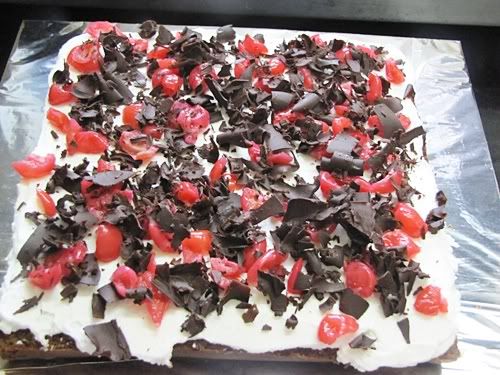
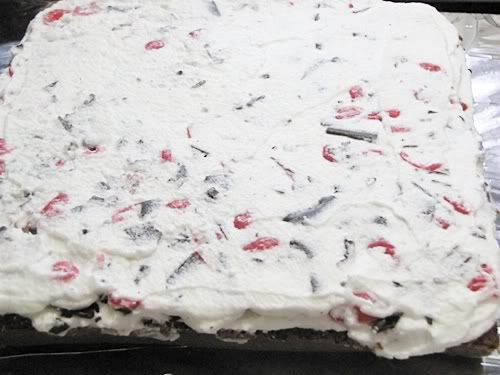
- Spread an even layer of fresh cream icing, top it with dark chocolate curls and cherries.

- Again top it with fresh cream, this will make sure your filling is in place.

- After topping with cream it will look something like below.

- Place the other half layer of cake carefully on the top and start covering the sides and top of the cake with the remaining icing. Before covering the sides of the cake do not forget to moisturize the top using the sugar syrup. Drizzle some syrup on top using spoon.

- Try to cover the sides and top as evenly as possible, don't worry too much if its uneven as anyways we will be covering it up with chocolates and cherries.

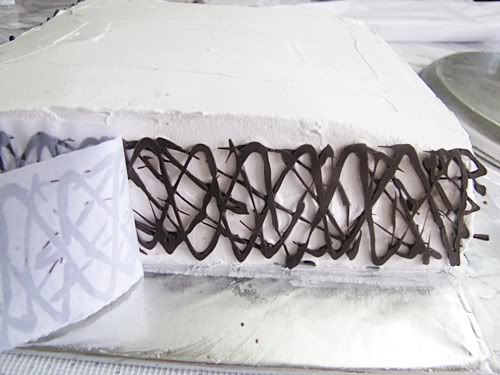
- For the sides you can simple sprinkle some chocolate curls or chocolate sprinkles but I have made a border out of melted chocolate and stuck the same on all four sides.

- Finally decorate the top of the cake with lots of chocolate curls and cherries, this decoration can be as you like, let you imagination play wild. I have kept it simple here.

Hope you all enjoyed the tutorial and do let me know if you have any other requests for tutorial and I will try post the same.
Love,
Wow...Parita...it seems I have hit upon a treasure...I will keep coming back to check on all the baking recipes...wow
ReplyDeleteYou have kept it simple huh., This is absolutely gorgeous. Thanks for the step wise pics.
ReplyDeleteAbsolutely gorgeous n very inviting cake.. made it to perfection n the pics make me drool they r so yummy..
ReplyDeleteBeautiful and drool worthy blackforest :) I can even eat the whole cake right now :) loving it :)
ReplyDeleteConvey my belated birthday wishes to your dad :) He should have been super happy to see his daughter baking a cake for him :)
Wow!!! really amazing step by step pics. The cake looks excellent , moist and perfectly baked.
ReplyDeleteAbsolutely gorgeous and droolworthy,thanks for sharing the stepwise pics,useful for many of us..
ReplyDeleteMy belated birthday wishes to ur dad..
Cool and nice cake. I too make like this, but still yet to try icing. Will try soon.
ReplyDeleteParita, it's looks so yummy. I am defenatity going to gain kgs as I am stucked to your blog. I did try meti malai mutter and it turn out so yummyyyyyyy. kissies form soon to be a small fat lady :)
ReplyDeleteWant to grab a piece..loved it and lovely color..such a spongy cake..
ReplyDeleteThe cake is so soft and spongy...It's lovely and beautiful...
ReplyDeleteHey Pari,
ReplyDeleteGreat recipe, cann you let me know where in Pune can I find heavy whipping cream. Thanks :-)
Wow...U nailed this one gurl!!! Perfecto!!!
ReplyDeletePrathima Rao
Prats Corner
cake looks perfect...well explained
ReplyDeleteAarthi@MunchMunchCrunchCrunch
New Event - HLI-DATES
Eggless Black Forest Cake looks Simply Perfect. Clicks are wonderful.
ReplyDeleteDeepa
Hamaree Rasoi
am totally drooling here. what a cake.
ReplyDeleteLovely!!! want a bite plzzz.....
ReplyDeleteAppreciate for the effort taken for step wise pitures and breif explanation.....
thanq dear....
so beautifully done parita, as always I love your cakes!, You know I am great fan of all your cakes, as always you rock girl :)
ReplyDeleteGreat pictorial presented in very simple manner, nice to see real time baking steps. Thanks Parita.
ReplyDeleteLovely pictorial and yummy looking cake
ReplyDeleteWow ! I enjoy these step-by-step recipes, you really have a lot of patience ! Cake looks awesome !
ReplyDeleteHey Parita,
ReplyDeleteAwesome cake n icing,I too have a passion for baking, thanx for sharing :)
http://liferocks-priya.blogspot.com/2011/07/sweet-tooth-p.html
Cake looks gorgeous :) thanks for the tutorial
ReplyDeleteCake luks delicious and I loved the chocolate curls design u used on sides...Which chocolate did u use to make the design??
ReplyDeleteBTW Birthday Wishes To Ur Dad :)
Thank you everyone for your kind comments!
ReplyDelete@Pari, you can find heavy whipping cream in Spencers, it comes in packaging of 250 ml or 200 ml sorry not able to remember the exact name,I have used Rich's whip topping this one is more trickier to get as its not easily available everyone but you can check with stores storing baking and chocolate making items, it should be available with them.
@Kavya, I used dark chocolate for making the border.
wonderful presentation and I just love your blog. I am so impressed by your cake recipes ! I have bookmarked your recipes and will try them for sure
ReplyDeleteFantastic Parita! The pictorial is great as is the cake :) cheers priya
ReplyDeleteLike I promised, Parita, you're the first to know - I baked some cupcakes and they turned out, well, not bad!! Do check it out at http://shocksandshoes.blogspot.com/2011/09/recipe-for-week-chocolate-cupcakes.html. Your tips would be greatly appreciated!!
ReplyDeleteGorgeous cake! It sounds delicious:)
ReplyDeleteHey.. I just came across here from another site. Must say ur site is really good and recipes looks yummy! m gonna have to try some. Keep up the good work!!!
ReplyDeleteI tried this at home Parita!! And it turned out just awesome following your recipes! Though I used a manual egg beater, gave my arms some workout too B-) Loved it!
ReplyDelete♥Sukanya
And it's greater coz very rarely hav i been able to bake cakes properly cz I too dont take eggs! Thank you for posting this!
ReplyDeleteI tried ur eggless choco muffins from foodlyrics and just posted..Thanks for such a nice recipe! :)
ReplyDelete3 cute awards are waiting for you....do accept them..
ReplyDeleteOHHHHHHHHHHHHH MY MY .... Parita am out of words .... this is something i will dream everyday from now on ....
ReplyDeleteI sware ....
hey give me your address na .....
will send my son ....
i mean both of us will come for a treat ....
awwww we loveeee this cake , am def. going to try this out and you wont believe my mouth is watering ...
EXCUSE me ...
will go and eat something :D :D
ohhhh now i know ...
ReplyDeletemy son and you will rock babe ...
he is also capri. :D :D am sure he will woo you with this gestures :D :D
Wow, great job Parita, loved your step by step presentation...
ReplyDeletethe cake looks simply delicious!!!!!the step by step pics are also great.
ReplyDeletethat looks like a perfect cake...
ReplyDeleteOMG...its looking delicious parita..
ReplyDeleteabsolutely yummylicious!!!
Wowwww yummy recipes Parita :) I didbt know you are into cooking and all :) Following you!!
ReplyDeleteim making methi mutter soon :)
wow wonderful will try sometime
ReplyDeleteHi Parita,
ReplyDeleteSuch an easy recipe... Are can I bake cake in microwave. I have the LG one with convection/ gill/ mw options.
i like your food pictures and want to invite you to try out tastingspot.com. it's for anyone that just wants another place to submit photos and share it will other foodies.
ReplyDeleteAwsome and Great work.Luv ur recipes and this delicious blog .Luv to follow U.
ReplyDeleteThanks so much for the step-by-step tutorial. I appreciate a lot. This cake is so gorgeous.
ReplyDeleteHey Parita, Check out my 'Biotique Skin Care + Lots more' GIVEAWAY
ReplyDeleteThe pictorial is wonderful and easy to follow! My birthday wishes to your dad! :) Love your blog, your style of writing and the variety of recipes!
ReplyDeleteTastyVegCooking
This is just too good to be true. Such a beauty and thanks for the step by step tutorial.
ReplyDeletedelicious dear..U have made it perfectly..Love to make this..
ReplyDeleteDo visit my blog too
http://yummytummy-aarthi.blogspot.com/
this is divine!!!believe me or not, I would share my techniques on how to play bingo and win it just for a piece of such a cake!!! oh I really need a gf)
ReplyDeleteWow, black forest is my fav. iam craving for some .. Bookmarked ur awesome cake recipe. thnx a lot :)
ReplyDeleteImpressive...Looks superb
ReplyDeleteNice cake! How much should be the oven's temperature? - Parinita
ReplyDeletehi parita gr8 recipe..keep up the good work.However I wanted to ask you the reason of using coke or pepsi in the black forest cake.I checked in other recipes of the same but they had not included it.please answer my query.
ReplyDeleteI love black forest cake! I surely bookmark this recipes of yours and try to do it myself. Hope i could make it as good as you.
ReplyDeleteParita , the cake looks great. You are amongst the first food blogs I got introduced to. it is my pleasure to invite you to my first blog event plus giveaway - Valentines Special. Do check it out and be a part of it. Would be great if you were there..!
ReplyDeleteMy event- Valentines Day Special
The pics are awesome, the steps are awesome and the cutie pie cake is beyond awesomeness:-)
ReplyDeleteI guess we could use soda instead of coke or Pepsi.
Thanks for sharing this valuable recipe.
Cheers,
Gurmeet
Lovely looking cake. Loved the eggless version of my all time favorite cake. YUM!
ReplyDeleteOMG this is so amazing...the cake is awesome and the decor is gorgeous...do u also take orderS?
ReplyDeleteWoww it looks sooo yumm <3 Lovely tute!!!
ReplyDeleterakhshanda-chamberofbeauty.blogspot.com
Hi Parita!
ReplyDeleteur blog is so yummy lukin! em joining ur blog, as i luv makin cakes.
U vl make me a gud gal in cooking!
I see a gujju newspaper in one of ur pics...
Great tutorial, it looks delicious!
ReplyDeletehttp://moonshine709.blogspot.com/
tht looks so tempting!!!
ReplyDeleteAmazing tute!!! It looks sooo yumm <3 <3
ReplyDeletehttp://rakhshanda-chamberofbeauty.blogspot.in
Hi Parita, you have been tagged into a FUN POST. Check it out here (http://mumma-world.blogspot.in/2012/03/tag-o-mania.html)
ReplyDeletefirst time here ...glad to follow you ...very yummy and too irresistable ....perfectly made ... visit my blog
ReplyDeletewww.sriyafood.blogspot.com
Dear Parita
ReplyDeleteI ve been a silent viewer here. tried ur eggless BF cake.
ur step by step explanation could make any novice baker an expert in baking !!
cake tasted awesome.
but somehow I did nt like the pepsi taste in my cake. do u have any other suggestions.
Hi Mitha..thank you so much for reaching out dear and m glad the cake tasted awesome..you can use plain bottled soda instead of pepsi or coke..you can even use milk :) I just feel soda/coke helps in texture of cake better than milk :) hope this helps..do let me know if incase of any doubts :)
ReplyDeleteHi Parita,
ReplyDeleteBeautifully decorated cake. Would like to know which kitchen aid do u use?I am planning to buy one.
Hey first time visitor here. The cake is just awesome.. Also the pictorial is very helpful. Glad to be your fan!!
ReplyDeletewow parita,
ReplyDeletethis is given in such a simple and easy to understand way! i want make one for myself & gorge on it :) i just love the borders u hve made with chocolate... awesome!
wow is the word :)
ReplyDeleteOne if my favorite desserts!
ReplyDeleteWow....never thot that black forest can be baked at home too...delicious and beautiful Parita!!!!
ReplyDeleteOh wow Parita. looks great. you make it sound so easy:)
ReplyDeleteHi Parita Great Recipe!! I wanted to know if I can use Sprite instead of coke/pepsi, Please let me know soon. Thank you.
ReplyDeleteHi Anonymous, yes you can use sprite instead of coke or pepsi..you can even use plain soda water..hope this helps
ReplyDeleteOH thank you, thank you, thank you !!!, I will try this, I hope it turns out like yours. Your awesome!!
ReplyDeleteBTW my name is Beena =)
you are most welcome Beena..do let me know how it turns out :)
ReplyDeleteHi Parita, Thanks for the recipe and they way to make it. The cake turned out great, thank you so much. Everyone loved the cake.
ReplyDelete-Beena
Thank you Beena...m glad it turned great :)
DeleteLooks amazing and so delicious.
ReplyDeleteThank you Nayna!
DeleteLooks sooo nice and simple.. but i know it pretty difficult to make :(
ReplyDeleteThank you so much Apoorva :)
DeleteThanks for the recipe and came out well. It was my first try baking cake. Kids enjoyed helping me and wife was impressed.
ReplyDelete